Curated Collection of Diverse Products
How I Converted a 6' x 6' Area in My Basement to Grow a Multitude of Vegetables
Have you ever dreamed of harvesting fresh, homegrown vegetables no matter the season? That was my goal when I decided to convert a 6' x 6' area in my basement into a thriving hydroponic garden. In this post, I’ll walk you through the hydroponic equipment I used, my setup process, and some tips for anyone looking to start their own indoor vegetable oasis.
HYDROPONICS
Arthur Comer
9/1/20253 min read
Why Hydroponics?
Hydroponics is a soil-free method of growing plants using nutrient-rich water. It’s efficient, space-saving, and perfect for indoor environments where traditional gardening isn’t possible. Plus, it allows for year-round cultivation, regardless of outdoor weather.
My Hydroponic Equipment List
Here’s a breakdown of the essential equipment I used to get my basement garden up and running:
Growing Area (6' x 6')
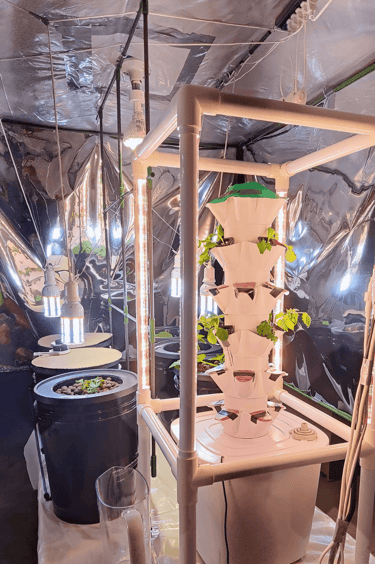
To maximize the light efficiency of the grow lights, I installed a VIVOSUN Reflective Mylar Film around the perimeter of the 6' x 6' growing area.
LED Grow Lights
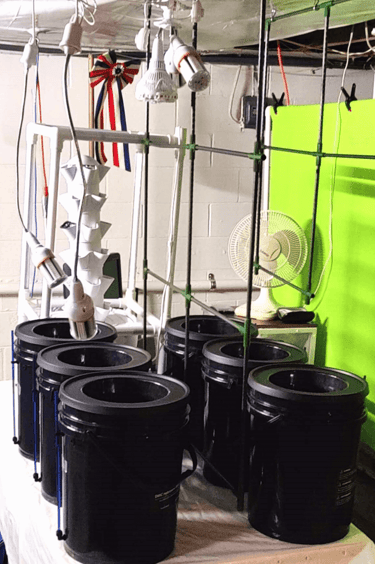
Full-spectrum LED provides the necessary light for photosynthesis. I hung four JURDXLED 30W, 4500 lumens, and a SANSI 40W, 4000 lumens adjustable light to ensure even coverage across the entire area.
Hydroponic System
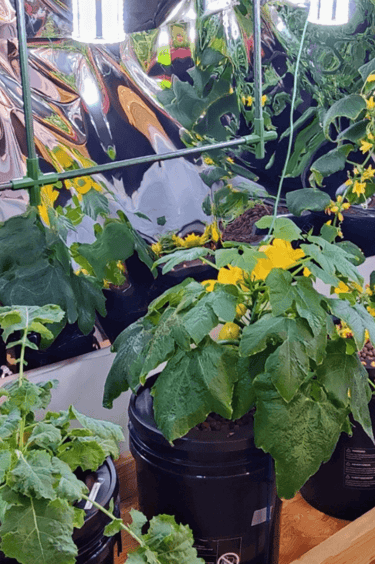
I chose a combination of VIVOSUN Deep Water Culture (DWC) buckets and a VEVOR Tower System (Nutrient Film Technique (NFT) channel). The DWC buckets are perfect for larger plants like tomatoes, cucumbers, and squash, while the NFT channel is ideal for leafy greens and herbs.
Air Pumps and Air Stones
The Vevor Tower System I use comes with smart timers to control water flow and the LED lights.
Water Reservoir
Both my 30-pod Tower Hydroponic System and my 6 Kratky DWC Bucket Systems have 5-gallon reservoirs.
pH and EC Meters
Monitoring pH and electrical conductivity (EC) ensures the plants receive the right balance of nutrients. I use the VIVOSUN Digital pH and TDS Meter Kits.
Timers and Power Strips
Timers automate the lighting and water pumps, making the system low-maintenance. I use the EIGHTREE Smart Plug, WiFi Outlet Works with Alexa & Google Home, Smart Home Socket with Remote Control & Timer Function, 2.4GHz WiFi Only, 4 Packs
Ventilation Fan
I converted a desktop fan I had on hand into a ceiling-mounted unit. Good airflow prevents mold and keeps the environment fresh.
Nutrient Solution
I use Masterblend Tomato and Vegetable Formula Fertilizer for my hydroponic system. Learn why here!
Vegetables I Grow
With this setup, I’m able to grow a variety of vegetables, including:
4 Varieties of Lettuce (Buttercrunch, Paris Island, Red Salad Bowl, and Black Seeded Simpson)
Kale and Swiss chard
3 Varieties of Tomatoes (Red Robin, Better Boy Hybrid, and Mushroom Basket)
2 Varieties of Peppers (Jalapeno Mild/Hot, Mini Bell Mix)
3 Varieties of Greens (Georgia Southern Creole Collards, Green Wave Mustard, and Purple Top Turnip)
Squash (Summer Dixie Hybrid)
Tips for Success
Start Small: Begin with easy crops like lettuce and herbs before moving on to fruiting plants.
Monitor Regularly: Check water levels, pH, and nutrient concentration at least twice a week.
Keep It Clean: Regularly clean your system to prevent algae and disease.
Experiment: Don’t be afraid to try new vegetables or tweak your setup for better results.
Final Thoughts
Converting a small basement space into a hydroponic garden has been incredibly rewarding. Not only do I enjoy fresh vegetables year-round, but I’ve also learned a great deal about plant science and sustainable growing practices. If you’re considering a similar project, I hope this overview of my equipment and setup inspires you to get started!
Although my setup is somewhat elaborate, you can try your hand at a simple hydroponic system for less than $5 (five dollars). Learn how here!
Happy growing!
Visit Amazon.com For All Your Hydroponic Needs
ALCJR Enterprises is an Affiliate of Amazon.com
See Disclosure Below!
I'd Love to Hear From You!
Email: arthur@alcjr.com
© 2026. All rights reserved.
ALCJR Enterprises
Affiliate Marketing Disclosure Statement
At ALCJR Enterprises, transparency and trust with my audience are paramount. By the Federal Trade Commission's guidelines, I want to ensure that you, my valued visitors, fully understand my relationship with the products and services I feature.
My Affiliate Relationships with Etsy, Amazon, Vevor, and Others
Some of the links on my website are affiliate links, which means that if you click on the link and make a purchase, I may receive a commission at no additional cost to you. These commissions allow me to continue providing valuable content. Please note that my opinions are my own, and I only recommend products or services that I truly believe will add value for my audience.
Why I Use Affiliate Links
Support My Work: The commissions earned through affiliate links help me maintain the quality and integrity of my content.
No Additional Cost: The price you pay as a customer is not affected by my affiliate partnerships.
Commitment to Quality: I am committed to recommending products that I have either used myself or thoroughly researched.
My Promise to You
I am dedicated to maintaining the trust of my audience. That's why:
I will always disclose my affiliate relationships clearly and openly.
I will provide honest reviews and insights, regardless of any affiliate partnerships.
I will prioritize your interests and ensure that my content remains unbiased and reliable.
Thank you for supporting ALCJR Enterprises. Your trust means everything to me. If you have any questions about my affiliate relationships, please feel free to contact me at alcjr@verizon.net.